Feeds:
Posts
Comments

Eggs in Bombay

So remember back when I talked all about how inspired I was by my new book?  Well, it took me forever, but I finally made a condiment.  The easiest condiment in the book.  Garlic-ginger paste. I made it last week.  It’s been sitting there ever since. Well, not quite.  I did slow cook some broccolini with a spoonful of the paste.  Wow.  Yum.

Well, since then I’ve been dreaming of a few different recipes. For one, Niloufer talks a lot about the Parsi obsession with eggs.  And since I have a habit of eating eggs for just about any meal, those recipes have been calling to me.  One of the methods she uses involves simmering a sauce (any type) in a wide, shallow pan, making little wells in the sauce, and cracking eggs into the wells to “poach” them.  So that idea has been dancing around my brain.  In another recipe, she utilizes onion tops.  Yes, the green tops from scallions, spring onions, leeks, and even garlic.  I practically survive on onions throughout the winter.  I just love their variety.  And each type can be cooked in a million different ways, producing such amazingly different results. So the onion top thing has been dancing in there too.

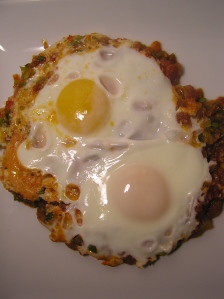
So tonight when did my daily scope-out-the-fridge-and-find-somethin’-for-dinner, I came across tomato sauce, spring onions, eggs, and my ginger-garlic paste.  Aha!  Dinner!

Have you ever eaten something sooooooo tasty that you didn’t even want to take a sip of water afterwards for fear of washing away the yumminess? That’s how I felt tonight.  And this is what I did…

Parsi-eggs with tomato, spring onions, and ginger-garlic paste
serves 1

  • 2 small spring onions or 1/2 bunch scallions, thinly sliced
  • 1 teaspoon ginger-garlic paste (recipe to follow)
  • 1 Tablespoon olive oil (or ghee, if you’re being authentic!)
  • 1/2 cup homemade tomato sauce
  • 2 eggs

Place a small, 8-inch saute pan over medium heat.  Pour in the oil and allow it to warm.  Add the sliced onions and a pinch of kosher salt and turn the heat down to low to cook very slowly, covered, for about 3-4 minutes.  Remove the lid, stir in the ginger-garlic paste, and continue to cook slowly for another 2-3 minutes.  The onions should be very soft.  Fold in the tomato sauce and continue cooking until the sauce is warmed through.

Make 2 shallow wells in the sauce (they have to be shallow because there isn’t much sauce here!), and crack one egg in each well.  Replace the lid and cook slowly until the eggs are “poached” to the doneness that you prefer.

Using a rubber spatula, slide the eggs onto your plate and gobble them up.

Ginger-garlic paste from My Bombay Kitchen by Nilourfer Ichaporia King

  • 1/2 cup peeled and roughly chopped ginger
  • 1/2 cup peeled and roughy chopped garlic cloves
  • 1/2 teaspoon salt
  • vegetable oil

Place the ginger, garlic, and salt in a food processor. Process until it forms a smooth paste, stopping to scrape down the sides of the bowl with a rubber spatula a few times, as necessary. Pack into a small jar or bowl and pour a thing film of oil over the top. Store in the refrigerator.

Sometimes inspiration finds me.  And sometimes it does not.  A cook by trade, I have found my inspiration in food for the past ten years, my interests hop-scotching from homemade sourdough bread to an oatmeal-raisin cookie obsession, poached eggs on anything, or a perfect afternoon cup of tea.

Of late, inspiration has been hard to find.  I suspect it’s been hidden in the over-tired shadows of my new-life-with-baby.  I have found that sheer exhaustion trumps any inkling of creativity when dinner time rolls around.  Or lunchtime, for that matter.  Almond butter and jelly have become required staples in our kitchen.  Especially since I’ve gone back to work.  The ten hours out of the house including the commute to and from work doesn’t leave much time for chores or eating or playing with my beautiful daughter, or sleeping. Truly, I offer a huge applause to working/nursing moms who manage to get dinner on the table for the family.  Tonight I ate almond butter and jelly. Again.   I wolfed it down actually.  Because who has time to eat?  Seriously!

And then I sat down and read one of the cookbooks I received for Christmas. It’s a cookbook I’ve been wanting for a couple years now and it made me hungry for real food!  The book is called My Bombay Kitchen by Niloufer Ichaporia King and the foreword is written by Alice Waters.  I’m really looking forward to cooking from it.  There are already more dog-eared pages than I could possibly try in the near future, but I read cookbooks optimistically!


So inspiration has found me this evening and perhaps, despite the exhaustion and the ever-growing list of chores, I’ll manage to have something decent for dinner at least once in the next few nights.  And this book….YUM!  Take a peek and see if it inspires you…I suspect it will!

I mean, seriously…can you resist?  No, don’t resist.  You’ll be missing out!  These cookies are really intensely chocolatey.  They are slightly crisp on the outside and soft-chewy on the inside, with the coffee flavor coming through, especially at the end.  They are perfectly paired with a tall glass of milk and frankly, I dare you to just eat one.  And a little birdie told me that if you want to get really down and dirty, you’d smear a dollop of peanut butter over the top and eat them like an ooey-gooey open-faced sandwich!

Be sure to buy chocolate that you really love.  Stay away from the Hershey’s.  I use Guittard for most of my chocolate baking projects.  The chocolate is tasty, and it’s not too hard to find these days in well-stocked grocery stores.

Double chocolate and coffee cookies barely adapted from Rick Katz’ recipe in Baking with Julia by Dorie Greenspan
yields about 24 cookies

  • 1/2 cup all-purpose flour
  • 1/2 teaspoon baking powder
  • 1/2 teaspoon kosher salt
  • 12 ounces bittersweet chocolate, cut into larger-than-chip-sized chunks; divided in half
  • 4 ounces (one stick) unsalted butter
  • 4 ounces unsweetened chocolate, chopped
  • 4 large eggs, at room temperature
  • 1-1/2 cups sugar
  • 1-1/2 Tablespoons very finely ground coffee or instant coffee powder
  • 2 teaspoons vanilla extract

In a medium bowl mix the flour, baking powder, and salt and whisk to combine .

Separately, combine the butter with unsweetened chocolate and half of the bittersweet chocolate in a medium bowl.  Set the bowl over a medium pan of simmering water (be sure that the water does not touch the bottom of the bowl) and stir every-so-often with a rubber spatula until completely melted.  Remove from the heat and set aside.

In the bowl of a standing mixer fitted with the whisk attachment, combine the eggs, sugar, coffee, and vanilla.  Whisk on high speed for about 10 minutes, until the mixture becomes light-yellow in color, and leaves a ribbon on the surface when drizzled with a spoon.

Turn the mixer down to the lowest setting and add the melted chocolate.  Scrape down the sides of the bowl and use a rubber spatula to be sure that all the nooks of the bowl have been evenly mixed.  Add the flour mixture and remaining chocolate chunks and mix only until just combined.

Scrape down the sides of the bowl, cover with plastic, and chill for at least 4 hours or overnight.

Place the oven racks in the center-most position and preheat the oven to 350º. Line 2 baking sheets with silpats or parchment paper.  Drop the cookies by the heaping-Tablespoonful onto the trays, leaving about 2 inches between each cookie.

Bake 10-12 minutes.  They are ready when they look slightly underdone in the center.  Immediately transfer the cookies to a cooling rack.

You will probably eat at least one when they are still warm.  I don’t blame you.  They are delicious!

Holy heck.  Has it really been over a month since the last post?  Yowsers.  What a busy holiday season we had!  We had family in town for nearly the whole month of December.  It was lovely but busy.  Somehow winter’s cold hadn’t really sunk in for me until this week.  (Perhaps it has something to do with the fact that I am now working the day shift at the restaurant and find myself standing on the windy BART platform at 6:15am? It is at that tired, chilly hour that my cheery optimism takes a momentary dip!)

So on a recent evening when January’s chill had set in our bones**, Scott made a big bowl of spaghetti carbonara. We proceeded to eat the whole thing save for about three bites which we told ourselves would be for the next day’s lunch, simply so we could go to sleep convinced that we are not actually complete gluttons!

** (I apologize to all you north-east coasters… I am, after all, a soft Californian)

Scott’s spaghetti alla carbonara
serves 4

I think many people shy away from making carbonara because of the raw eggs that get folded in at the end.  It seems a little fussy.  But try it- you’ll like it!

  • 2 Tablespoons olive oil
  • 1 medium yellow onion, diced
  • 4 ounces pancetta or guanciale, minced
  • 4 egg yolks
  • 1 pound spaghetti
  • 1/2 cup pasta-cooking water
  • freshly cracked black pepper to taste
  • finely grated pecorino romano to taste (I didn’t measure this(!) but I’m guessing it was about 4 ounces)

In a medium saute pan set over medium heat,add the olive oil and pancetta and render the pancetta until it begins to release it’s fat.  Add the diced onion and cook gently until the onion is translucent and the pancetta is just beginning to crisp.  Separately, place the egg yolks, pecorino, and black pepper in a large bowl and set aside.

Meanwhile, cook the spaghetti in salted water.  Before the spaghetti is done, remove 1/2 cup of the cooking water and set aside. When the spaghetti is al dente, drain it and toss with the onion-pancetta mixture.

Be prepared to stir with a wooden spoon and add about 3/4 of the reserved pasta cooking-water to the bowl containing the egg yolks and cheese.  This will become the sauce.  Stir quickly to loosen and temper the egg yolks. (Tempering the eggs makes them less likely to scramble when you add the hot pasta).

Again, be prepared to stir quickly.  Add the hot spaghetti mixture to the egg/cheese bowl and stir quickly so that the egg mixture evenly coats the spaghetti.  Add a little more of the reserved cooking-water to loosen the sauce slightly if necessary.

Serve immediately, topping with more freshly grated pecorino.

Enjoy!


A cozy loaf

Baking in the winter is great for two reasons.  1) the oven warms the house. 2) the activity warms your body.  Ok…3) you get to eat the results!

And yeah, yeah, pies, candies, cookies, the holidays…but is there really anything more yummy, more satisfying, more…more…heavenly than eating slice after slice of your own homemade bread with a smear of butter and jam?

I have a distinct childhood memory.  My cousin and I were at Grama’s for the night.  Grama made this bread.  We ate this bread.  We ate more of this bread.  I think we came close to finishing the loaf.  I’m pretty sure I forgot to save room for dinner.  And it’s funny how a single memory can bring back so many more.  I also remember sneaking into the back bedroom to watch Michael Jackson’s Thriller video on MTV.  Oh, and eating red jell-o…not exactly eating it, but swishing it between my teeth until it liquified…we were making “medicine”…ahhh, the memories!  And I also remember dunking Oreo cookies in Grama’s coffee until the soggy cookies fell to the bottom, turning her brew into a cloudy, crummy mess.  What a great Grama!  To sacrifice her coffee!

Anyway, if you’d like a great loaf of really versatile, delicious sandwich bread, I’d recommend this one.  It’s a moist loaf with a touch of sweetness and frankly, I love it!

Whole wheat-oatmeal sandwich bread adapted from great-Grama Akre’s recipe
yields one loaf

Feel free to play around with sweet aspect of this bread.  I use honey, but you could also use molasses, brown rice syrup, brown sugar (in this case, add another 1/4 cup), or even barley syrup.  Next time I bake, I’d also like to experiment with using bread flour rather than all-purpose.  If you get to it before me please, let me know how it goes!

  • 2 cups boiling water
  • 1 cup rolled oats (not instant)
  • 1-1/2 teaspoons kosher salt
  • 2 Tablespoons unsalted butter
  • 1/2 cup honey
  • 1 package (2-1/4 teaspoons) dry active yeast
  • 3/4 teaspoon white sugar
  • 2 cups all-purpose flour
  • 1 cup whole wheat flour

In the bowl of a standing mixer fitted with the dough hook, combine the oats and the 2 cups boiling water.  Stir to moisten, and add the salt, butter and honey.  Stir again, and set aside to cool to room temperature.

In a small bowl, combine 1/2 cup lukewarm water with the yeast and white sugar.  Stir to completely dissolve and add to the above, cooled, mixture.

Add the all-purpose and whole wheat flours and mix on the lowest speed until the dough begins to come together.  Then turn the speed up to medium-low and knead for 10 minutes.  The dough will remain a bit sticky.

Turn the dough out into a well-greased, large bowl, cover, and allow to rise until double in size (approx one hour).

Preheat the oven to 350º with the oven rack in the center-most position.

Turn the dough out onto a lightly floured counter and punch down.  Knead a few times, then fold the dough like a business letter (tri-fold) so that it fits into the loaf pan.  Allow to rise again until the pan is full, 30-60 minutes.

If you’d like a shinier crust, you can brush the top of the loaf with a bit of milk, or milk mixed with egg before it goes in the oven.  I like the very rustic look of the matte-finish, so I leave it plain.

Bake the loaf for 60-65 minutes or until a thermometer inserted into the center registers 200º.

Allow to cool completely before slicing. (or as long as you can hold out!…that being said, slicing a warm/hot loaf of bread results in a gummy crumb, so it truly is best to let it cool nearly completely before slicing).

Enjoy!


Delicate?  Ummm, not so much.  Not after that gorge-yourself-all-day-and-then-eat-a-plateful-of-heavy-starch-laden-food day that we call Thanksgiving.  Oh, I was thankful alright.  Thankful for that box of elastic-waisted maternity pants I still have hanging around!

We’ve been eating leftovers all week, including turkey sandwiches, and I just never get tired of them.  Scott really goes heavy on the Dijon mustard, which brings back fond memories of the trip to Burgundy that I took with my sister and her boyfriend.  It was freezing.  Like really, dang cold. I mean, for a California girl it was really, dang cold. But the skies were blue (or should I say “bleu”), and most days there wasn’t a cloud in the sky.  Amazing. Take this for example…

I took that picture.  With my little point-and-shoot.  Talk about a brilliant “bleu” sky.  Ahhhhh, ohhhh, ooooooh.

And then I come out of my “oh, I’d love to get back to France one of these days” trance, and remember that there are baby toys littering the floor, the cat litter needs cleaning, and we still haven’t figured out a plan for dinner tonight.  And do I feel delicate?  Ummmmmm.  Nope.  Not so much.  (Don’t get me wrong…I love my new life!  Especially since I- just this morning- discovered that I can once again fit into my favortite, pre-maternity, cold-weather, comfy jeans.)

So what’s the perfect antidote?  Why Delicata squash, of course!

I did a very simple thing.  I roasted it with butter and rosemary.  We ate it alongside braised dinosaur kale and a poached egg and it was a refreshingly light, tasty meal.  It left me feeling sated, happy, and well…not exactly delicate, but at least I didn’t feel stuffed beyond capacity.  (I still have more pre-maternity clothes to get into, afterall!)


Roasted delicata squash with rosemary and butter
serves 2

While this turned out great, next time I may try baking at 425º or 450º to see if I can get a little more browning on the edges of the squash.

  • 1 delicata squash
  • 1/8 teaspoon kosher salt
  • 2″ sprig of rosemary, minced
  • 1 Tablespoon butter, softened
  • sprinkling of fleur de sel (optional)

Preheat the oven to 400º.

Cut the squash lengthwise, into quarters.  Rub the cut sides of each piece with the butter, evenly distributing it among all four pieces.  Sprinkle the rosemary and salt over the four pieces, and then place the squash on a cookie sheet or baking dish.  Roast in the oven for 45-60 minutes, until the squash is completely tender and the edges are beginning to brown.  Remove from the oven and sprinkle with fleur de sel.  Allow to cool slightly before serving.

Cranberry Sauce

I’ve been pondering cranberry sauce for about a week  now.  And truth be told…(I’ll let you in on my little secret)…I have a special place in my heart for canned cranberry sauce.  I just kinda love the perfect round slices from the perfect round can-shaped cylinder.  But that and the homemade stuff are two completely different things.  I was hoping to make something that had a nice, fresh, jammy flavor with flavors that sing, “the holidays are here!”  So I fiddled around this morning, and this is what I came up with…

homemade maple-cranberry sauce
yields a little more than 1 quart

Make the cranberry sauce at least a day in advance to allow the flavors to marry.

I used Grade B maple syrup because it has a stronger maple flavor, but I’m sure Grade A would do just fine.  Also, it’s important to use a wide, shallow pan to poach the cranberries so that they are mostly submerged in the cooking liquid.

  • 2-12 ounce bags of cranberries
  • 1 cup water
  • 1/2 cup plus 2 Tablespoons maple syrup
  • 3/4 cup white sugar
  • 2 chili pods, broken (or a pinch of chili flake)
  • 2 whole cloves
  • 1 bay leaf
  • 1/4 teaspoon kosher salt

In a 12-inch saute pan, combine the water, maple syrup, sugar, chili pods, cloves, bay leaf and salt.  Warm over medium-low heat for about 5 minutes to dissolve the sugar and salt and to  allow the other flavors to bloom.  Add the cranberries and turn the heat up to medium, stirring occasionally.  When the cranberry skins begin to pop, turn the heat back down to low.  Continue cooking for a total of about 20 minutes, until most of the berry skins have popped, allowing the poaching liquid to penetrate.  Remove the pan from the heat and cool the sauce either in the same pan or in a shallow dish.  Pour the sauce into jars or a bowl until ready to use.

And so today, I offer you this cute, fake bird so you don’t have to look at a giant (27-pound!!) raw turkey bobbing in a bag o’ water.  This Thanksgiving we get to cook for 29 people.  Ahhh- the best holiday of the year.  And I’m pretty sure my parents think they’ve won the lottery now that my sister is dating a cook too.

So today’s job is brining the turkey.  This is what we’re gonna do.

(…and slotted for tomorrow…cranberry sauce!)

Brining our turkey

This brine can be increased or decreased depending upon the size of the bird.  This year, we tripled it.

  • 3/4 cup kosher salt
  • 3/8 cup sugar
  • 1 gallon room-temp water
  • a few bay leaves
  • half a head of garlic
  • 1/2 bunch of sage
  • 3 whole allspice berries
  • 3 juniper berries

Combine half the water, salt, sugar, bay, garlic, herbs, and spices in a pot large enough to hold it all. Place over high heat and bring to a bare simmer.  This will allow the salt and sugar to dissolve and the aromatics to bloom. Cool to room temperature and add the other half of the water.  Place the turkey in the brining bag* and pour in the brine. We’re going to brine our bird for 3 days.

*If you’re using a brining bag as opposed to a bucket, you’ll need to be sure to rotate it a few times over the next few days to make sure that the whole bird gets equal contact with the brine.

Alas, it’s nearly impossible to complete a project in the kitchen, and even harder to sit down at the computer to key in a clever write-up.  Because if you had the choice between hours on your feet or cooing at her….which would you choose?! But I have had a few spare moments to peruse a cookbook or two in lieu of actually cooking!  And with this drizzly, gray weather we’ve been having, this book has my heart!

Eggplant Parmesan

I can attest to the fact that this is excellent at room temperature.  And let me tell you why I know this.  My darling little Chloe seems to know exactly what time dinner is to be served.  No matter her sleeping schedule during the day, she makes it a point to wake up just as we’re sitting down to eat.  And she’s not interested in hanging out in our laps.  She wants to EAT!  So, alas, I feed her.  And when she is sated, I get back to my Eggplant Parmesan.  No longer hot.  But still delicious.

Eggplant Parmesan
yields 8-10 servings

To make your own fresh breadcrumbs, cut a large rustic loaf of bread in half and allow it to stale overnight.  The next day, use a bread knife to remove the crust and discard.  Cut the bread into rough cubes and process in a food processor until fine (nothing larger than 1/8-inch).

For the tomato sauce:

  • 1 yellow onion, diced
  • 3 Tablespoons olive oil
  • 2 large garlic cloves, minced
  • 1 small bay leaf
  • a pinch of chili flake
  • kosher salt to taste
  • 2 14-1/2 ounce cans whole, peeled tomatoes
  • 1 cup water

Place a medium sauce pan over medium heat and add the olive oil.  Add the onion and cook until it begins to soften.  Reduce the heat to medium-low and add the garlic, chili, bay, and salt.  Continue to cook gently until translucent.

Meanwhile, pour the canned tomatoes and liquid into a medium bowl.  Use your fingers to break up the tomatoes and remove any skin that remains.  Add to the cooked onions.  Use the water to “rinse” out the cans, and add to the pot.

Bring to a simmer, turn the heat to low, cover, and cook gently for about 45 minutes.  Taste for salt and set aside.

For the eggplant Parmesan:

  • 1 batch tomato sauce (see above recipe)
  • 2 large globe eggplants
  • 2 Tablespoons kosher salt plus another sprinkle on the fried eggplant
  • 4-5 cups fresh breadcrumbs
  • 3 whole eggs
  • 3/4 cup all purpose flour
  • 2 ounces finely grated Parmesan cheese
  • 1-1/4 cups vegetable oil or pure olive oil
  • 8 ounces mozzarella

Slice the eggplant into 1/2-inch rounds.  Lay them on a rack resting over a cookie sheet and sprinkle 2 teaspoons of kosher salt over them.  Allow to sit for approx 10 minutes.  Flip the eggplant over and sprinkle the other side with 2 teaspoons of kosher salt.  Allow  to sit for 1-2 hours.

Using paper towels, pat the eggplant dry.

Meanwhile, set up a “breading station”.  Pour the flour onto one plate.  Pour some of the breadcrumbs onto another plate (you’ll add more crumbs as needed), and pour the eggs into a wide, shallow dish.  To bread the eggplant, first coat the slices in flour, then dip them in the egg, and then coat them with the breadcrumbs.  Place the breaded eggplant back onto the racks and allow them to “set” for about an hour.

Preheat the oven to 400º.

Heat about 1/3 of the oil in a large saute pan set over medium-low heat.  Carefully place a single layer of breaded eggplant slices into the hot oil and fry until golden brown on both sides.   Set back on the rack and salt lightly.  Remove any burned bits from the pan, add more oil as necessary, and continue this process until all the eggplant has been browned.

Spoon about 1/4 of the tomato sauce into the bottom of a 9×13 baking dish.  Place a layer of fried eggplant on top of the tomato sauce.  Spoon another 1/4 of the tomato sauce over the eggplant, and sprinkle with 1/3 of the Parmesan and 1/3 of the mozzarella.  Add two more layers of eggplant, sauce, Parmesan and mozzarella.**

Cover with baking dish with a layer of parchment paper*, and then aluminum foil, and bake for 20 minutes.  Remove cover, and bake for another 30 minutes, until the sauce is bubbly and the cheese is golden.

Allow to cool for about 15 minutes before slicing and serving.

*The acidity of the tomato sauce will react with the aluminum foil creating an “off” taste.  Always use parchment underneath foil when topping ingredients that are acidic.

**Another way I like to make this is to place the eggplant into the dish by tiling them (slightly overlapping) in a single layer, rather than stacking.  This method uses a little less eggplant and results in more crispy parts.